What does a Garden Gnome do when she is not gardening, in the kitchen or doing genealogy? Well the answer might just surprise you so read the entries to find out more. This blog focuses on everything we do to make our house a home. There will be a strong emphasis on home energy efficiency and do-it-yourself (DIY) projects. At the same time there will also be crafts, knitting and crocheting projects along with any other little tips we do to create that down to earth, I want to be here home. Please enjoy your visit :)
It is surprising how a even a small air leak can cost a lot in terms of household comfort and heating/cooling costs. In terms of energy conservation it is extremely important to seal any air leaks as soon as you find them. When painting rooms remove window trim and basebords on outside walls. Seal any cracks and crevices with caulk or expandable insulating spray foam depending on the size of the gap. Paint the room then replace the trim. This little bit of extra work will pay off in huge savings over the years and it really only needs to be done once if done properly.
 The Gap
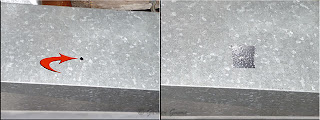
One area where a lot of air infiltration can occur in a house is the sill plate. This is where the house sits on the foundation. This should be sealed to prevent drafts and air leakage. The problem is a lot of times this joint is behind walls and covered by baseboard. Whenever we do any renovation job we try to uncover this joint (red arrow) and seal it. However in some cases the carpeting is tucked right up in there acting somewhat as a draft stop but not totally stopping all drafts. We removed the carpeting revealing the long crack that caused the house to immediately start cooling. The outside corner was horrible to the point that while waiting to pick up more insulating foam a large icicle over 2 - feet long formed on the outside corner in that spot but hanging from the eavestrough from air leakage causing melting snow. This is on a house where icicles are very, very rare and even if they do form they are tiny. Icicles are a sure fire sign of heat loss from the house.
 DAP®tex®
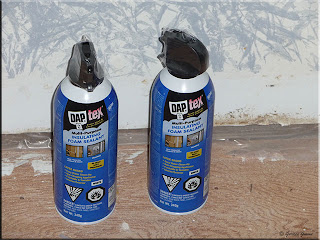
I mentioned in a couple of posts that Great Stuff® expandable spray foam insulation is one of my favourite insulating mediums. It is an inexpensive effective with a very low pay back period of usually well under a year. Once the foam expands the effects are immediate even before it is cured and ready for tooling. The downside with Great Stuff® is it is polyurethane based so not easily cleaned up. Disposable gloves are recommended as are old clothes as uncured foam will stick to clothing and skin.
My husband picked up 2 tins of DAP®tex® to try. This is a multi-purpose insulating foam sealant that is latex based and won't over expand. It is for interior or exterior use, paintable and toolable. The foam needs to be tooled before curing and once cured the skin should not be broken. The foam needs to be painted when used for exterior applications. This foam does behave differently than Great Stuff® bit ot achieves the same purpose. What I appreciated immediately is there was no odour. The foam was easy to apply and tool while wet. All in all I was quite pleased with the performance of this product so will use it again.
Garden Gnome
©2006-2010

A current study found that half a million Brits change their bed sheets only 3 times a year. I'm sorry folks but this just fall into major ewww factor of homemaking. At one time I can recall bedsheets being changed weekly. Clean sheets drying on clotheslines were a normal weekly sight. Heavier comforters and quilts were changed according to the season. Children's linens were changed more often out of necessity rather than desire.
What is the point of daily personal bathing and wearing freshly washed clothing yet spending a good 8 hours each night in dirty sheets? Not changing bedsheets allows allergens and dust mites to build up in the bedding causing both respiratory problems and allergic reactions as well as harbouring disease causing organisms.
Our bedsheets are changed weekly unless we aren't home for that week. Saturdays have always been the sheet washing day and even when the kids were young Saturday was the main laundry day although with little ones doing laudry during the week was quite often necessary. With as little as 2 sheet sets you can change the bedding weekly without having to rush to wash the sheets before nightfall. I like putting the pillows through the wash monthly while putting them through the dryer on air setting weekly. This just helps get dust and dust mites out of the pillows while freshening them. I honestly think stretching changing your bed sheets on a regulary weekly basis is a healthier choice!
Garden Gnome
©2006-2010
A few days ago I posted about our renovation plans to change a bedroom that had become storage since moving into a craft room. At the end of day one the room was empty ready to determine what needed to be done. Before I go further into the details of the renovation that will be covered over several posts from start to finish, I thought I would show you the custom built-ins in the existing closet. Every closet in this house has custom built-ins to maximize the storage space. In addition to that any small nook and cranny has also been turned into custom storage. So we are quite lucky in this respect.
 Tall Built-in
The closet is 2'11" D x 7'4" W at the maximal points. A 1'3" shelf spans the entire width of the closet 17" from the ceiling. A heavy duty metal pole is mounted on the bottom of this shelf and spans 5'6". We have decided to leave the existing closet as is with the exception of removing the carpeting and baseboard. That may change as we may put a fresh coat of paint on the walls just so the closet matches the room when the door is open. The walls and ceiling are in good condition.
Pictured is the short end wall of the closet that goes between that closet and a cedar lined linen closet. I'll write more on the cedar closet later when we get to doing the hallway. The folding closet doors fold towards the entrance to the room. The function of built-in storage unit is a bit of a mystery. It is 6' tall, 13" wide and has 11 deep slots. There are no bottoms on the slots so it could not be used for magazines as they will fall through. I am sure I will be able to come up with a way to use this built-in. The metal bar will remain since it is ideal for hanging homemade candles and even fabric waiting to be turned into the next project. We will likely add some type of storage along the back wall of the closet to take advantage of that space as well.
 Custom Shelving
The opposite end of the closet is on an outside wall. Pictured is the custom shelving that was added. On the long end of the closet tucked in the corner are 3 24" deep shelves. The long top shelf continues over this right to the end wall. Once organized these shelves will provide an incredible amount of storage. Just inside the door is custom shelving using that is 11" deep at the widest point. There are 6 shelves spanning from just above the floor to just below the ceiling. Again this smaller unit will provide a great storage area for many craft items.
The wallpapered portion (flowers) is not a wall even though it has been made to look like one. It is a concrete chimney rising up from the furnace room, going through this closet on its way outside. The gas water heater vents through this chimney and while there is the possibility of updating the water heater run which we may do anyway when the new on demand water heater goes in, we would gain little in doing this. The chimney is in very good condition and is capped to prevent precipitation and critters from getting in so now we are leaving the chimney as is since the closet will provide plenty of storage in this room especially when combined with the new storage that will be going into the room.
Garden Gnome
©2006-2010
It's always interesting moving to a new home then discovering all those little things you didn't notice when you viewed the house. In fairness we went through the house only once before signing the papers and a quick trip through for measuring just before moving. This is fairly typical of most home purchases I think. Unlike some we did not get a home inspection as this house was purchased based on location but I have to tell you this is our fifth purchased house and we have never had home inspections for any of them. As long as the buyer is well away of what they are getting into with the house I don't feel a home inspection is worth it.
During the heating season the indoor air can get quite dry. Most people are comfortable at humidity levels between 30% and 50%. Lower than 30% humidity will result in increased colds due to irritated and dry mucosal membranes, dry skin, dry hair, wood/furniture damage, drywall/plaster cracking and increased static electricity. Humidity levels higher that 50% can create mold issues, moisture problems, insect problems, wood/furniture damage and provide the ideal environment for dust mite population explosion. In our area a humidifier is commonly added to the furnace to improve dry winter air while in the summer a stand alone dehumidifier and/or air conditioning is used to reduce indoor humidity. Those using other heating systems than a furnace often use a stand alone humidifier.
 Old Humidifier
We knew the furnace here was old and that we cannot have it repaired as the manufacturer went out of business so parts are not longer available other than very generic parts. However, the previous owner had the maintenance record since the installation in 1983. The furnace was routinely checked and any necessary repairs done each fall. In addition to this the previous owner shut down the house for the winter months to vacation in Florida for 10 years prior to us buying the house so the furnace was used mainly in October. As a result the furnace is in excellent condition. We have been advised not to replace it until absolutely necessary. Just in case you are wondering about the energy efficiency of the furnace, our January gas bill (dryer, furnace, fireplace, outdoor grill) was $100.21 (31 days/406.674 total cubic meters gas used).
Pictured is the old furnace humidifier that was actually installed incorrectly. Sorry the humidifier went from that spot directly into the garbage so I didn't get the brand name in the blink of an eye. It was toast! It had actually been installed on the hot air return quite contrary to the new humidifier.
 Wait 6000 Humidifier
We have an uncanny knack of being able to get great deals on necessary home improvement items simply because we are willing to wait until we see a great deal. The list price for the Wait 6000 Humidifier was $179 but we got it for 50% off and we bought it back in the late summer when we were still dealing with plumbing issues. Certain items like this can easily be bought at greatly reduced or clearance prices then installed later as you have time. For example we have the Moen faucets and tub/shower assembly bought on clearance at the same time we bought the kitchen sink and faucet but we saved enough to warrant buying it then.
The AirKing® Wait 6000 Humidifier is a flow through model that uses up to 12 gallons per day. It can be heat activated unit can be set to the desired humidification that should be somewhere between 30% and 50%. This humidifier only comes on after the furnace cycles on then turns off immediately after the cooling cycle. A flow through humidifier does use water so an inline restrictor but there is no tumbler or moving parts. It may be necessary or the valve controling the water supplied to the unit can be turned to the amount of water being drained is acceptable.
 Duct Problem
One problem is older heating systems is the duct work. Contrary to many beliefs, actual duct tape is not good for sealing ducting seams, hole or other problems. Metal foil tape should be used instead and be careful when using this tape as it can give little cuts across your fingers. The metal foil tape gives a nice tight seal that won't lift over time as regular duct tape will.
Any home heat ducting system should be checked for air leakage. Any air leakage from the duct work via holes or seams ends up costing money because the heated or cooled air is not getting where it is supposed to go. Seal any holes (red arrow) with metal duct tape. This is a very simple, low cost yet effective way of making your furnace/air conditioning more efficient.
 Installed
Installation meant removing the old humidifier and patching that hole with sheet metal (red arrow) and cutting 2 new holes. It turned out to be a bit more complicated than planned so the project ended up taking about 4 hours. In the end after a few tests we assured ourselves the humidifier was working properly. According to the instructions we were supposed to set the humistat at 50% for the first 2 weeks of operation to allow the humidity level in the house to equalize. This also ensures the unit cycles on with every furnace cycle. After this initial run the humistat can then be adjusted to a comfortable humidity level. In our case we will aim for the 30% to 35% humidity level.
On a scale of 1 to 10 I would rate this project as a 7 in terms of ease of installation as a DIY project with 1 being easy and 10 being hard. Much will depend on whether there is a pre-existing humidifier and whether it is in the correct location. A water line will need to be tapped into if there is no pre-exisiting humidifier. A drain line will also need to be installed if one is not already there. So this is a project that can take a fair number of DIY skills.
Garden Gnome
©2006-2010
This past Wednesday we decided it was time to work on the craft room. Well it isn't really a craft room at the moment but it is a spare bedroom that we are converting to a craft room. I have always been heavily into all kinds of crafts and genealogy. Both take up a lot of space in terms of work and storage and they tend to overflow into every room of the house. A craft room is just exactly what I need.
 Before
I'm embarrassed to post these two pictures but this is how the room looked Wednesday morning. When we moved in whatever didn't fit somewhere ended up in the blue room. It was easy to organize the closet with its build-in extras as best as possible (2) then used the rest of the space for temporary storage (1). A couple of times I went through doing enough de-cluttering to free up room for more stuff in for temporary storage. We actually got rid of a lot of stuff this way. Essentially if it didn't have a home in the other rooms of the house it went to the blue room where it stayed in limbo until it ended up in the donate or toss bin.
 Empty
Empty
This is fifth owned house and believe it or not we have actually clued into the idea that emptying a room before doing any renovations works best. The entrance to this room (3) faces the long wall of the room with one window. The wall behind the door opens to the closet (4) that has 4 great customized built-ins. The long wall (5) across from the opening will likely be wall to wall built-in storage. The end wall opposite to the (4) has a window then small recess to which the previous owner had a built-in desk (6). That is one thing about this house is there are so many customized built-ins
By the end of day 1, the room was cleared so were were into rip out stage. A corner of the rug had been pulled back so in tomorrow's post I will share what we found.
Garden Gnome
©2006-2010
I mentioned in my last post how upset I was to discover that a plywood subfloor had been nailed down over hardwood. While we wait for an answer on restoring our hardwood floors I thought I would share some of my thoughts on flooring. I detest carpeting! Carpeting has to be one of the most eco-unfriendly things in your house. It holds and traps so much dirt and allergens. It is home to the wonderful dust mite that can cause a host of problems for those allergic to them. At the same time carpeting cost you to vacuum and steam clean both of which cause further problems as far as air quality and/or increased dust mites. My goal has been to get rid of all carpeting in our home. I could maybe handle an area rug for the winter but other than that I want my floors bare. No vacuuming, no steam cleaning and no ugly stains! At most I will have to damp dust a few times a week but that doesn't use electricity and it really wouldn't take more than about 15 minutes. So that means we are in the process of removing every bit of carpeting from the house as quickly as we can replace it with hard flooring.
I'm leaning towards restoring the upper level hardwood floors if at all possible. In the lower level we will be using laminate flooring in the master bedroom as it is below grade and hardwood shouldn't be used. The pantry and laundry rooms already have sheet flooring that don't need replacing and while the kitchen has ceramic tile we will be replacing it. The open concept family room and small bathroom will be tiled as well. I should have the first of the craft room renovation posted tomorrow so be check back.
Garden Gnome
©2006-2010
We are in the process of turning a spare bedroom into a craft room so please watch over the next couple of weeks as that will be the main topic here. I promise there will be before and after pictures as well as pictures of of progress. We are into day 2 with the room emptied except for closet shelves and by tonight the carpet and padding will be gone. I am already disappointed with two findings!
First this room is going to be repainted so I looked into Ceramic InsulCoat Paint that claims to provide R-24 insulation. From what I saw it had a lot of potential. Then I found the studies on this paint. This is a reflective paint that will not save heating dollars in Canada and in fact according to the study while the paint would save money during the summer by reflecting sun rays outside, in the winter months it would prevent warming solar heat gain so would actually make your heating costs higher. Despite my high hopes of trying this product we won't be as our main goal is to reduce heating costs not inadvertedly increase them!
My second major disappointment is the floor. We peeled back a good sized corner of the rug and underlay. Where there should have been hardwood given the age of our house we were met with plywood subfloor. Removing a 1" x 3" section of the plywood by the heating vent revealed what I was expecting, hardwood. I was almost sick to my stomach when I saw what they had done. The plywood is nailed about every 8" so we aren't sure if we can remove the plywood and salvage the hardwood. A friend of ours who is into home restorations and repairs specializing in woodworking will be here Saturday so we are going to get his educated opinion then go from there.
Garden Gnome
©2006-2010


 The Gap
 DAP®tex®
 The Problem
 Expanded Foam
 Insulating Foam Trimmed
 Removing Carpet
 Floor Doscpveru
 End of the Day
 Tall Built-in
 Custom Shelving
 Old Humidifier
 Wait 6000 Humidifier
 Duct Problem
 Installed
 Before
 Empty
Empty